

Turn a Military Diagram into a Life Skill- Stop Obsessing over Layer 4-6 and Start Winning at Layer 1-2
0 comments
55
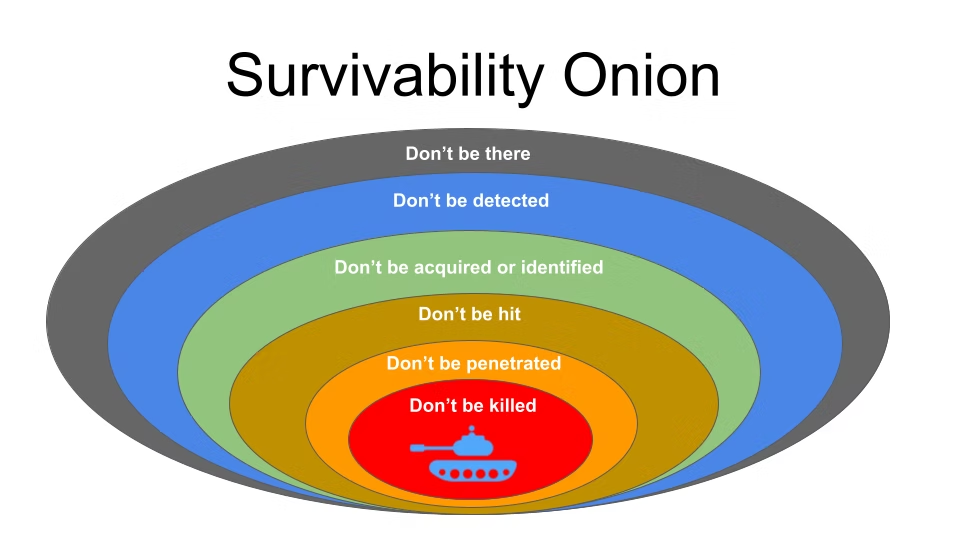
The Survivability Onion comes from armored warfare. It is one of the best frameworks for teaching self-defense because it forces people to stop obsessing over Layer 4-6 and start winning at Layer 1-2.
We adapt it for civilians like this:
1. Don’t Be There
2. Don’t Be Seen / Noticed
3. Don’t Be Acquired / Targeted
4. Don’t Be Hit
5. Don’t Be Injured
6. Don’t Be Killed
Sun Tzu’s core teaching is that the highest form of victory is to “subdue the enemy without fighting,” achieved through intelligence, preparation, and strategic positioning rather than direct combat. The old guy was on to something here. If you fight, you get hurt and sometimes you lose. Minimize the risk and the damage. Live to fight another day.
The rule: You want to win as far OUTSIDE the onion as possible. Each layer you go inward costs more, hurts more, and has worse odds.
Here’s how to turn it into a 90-120 minute teachable block.
### How to Teach It
Don’t just lecture it. Draw it. Draw 6 concentric circles on a whiteboard. Label them outside-in. Start every layer with: “What is the goal here? What does winning look like? What does it cost?”
Teaching script: “If you lose this layer, you fall inward to the next one. We never skip layers.”
—
### Layer 1: Don’t Be There – Avoidance
**Goal:** The fight that never happens is 100% survivable.
**What to teach:** This is not cowardice, it’s strategy. Criminals need you to be in a bad place, at a bad time, doing a bad thing, with bad people.
**Examples:**
– Choosing not to go to the ATM at 11pm
– Leaving a gas station when you see two people loitering with no car
– Crossing the street when your gut says something is off, even if it feels rude
**Drills:**
1. **Pre-Mortem Map:** Students pull up Google Maps of their daily routine. Circle 3 locations/times that violate Layer 1. Have them rewrite the routine.
2. **The 5-Second Leave:** In class, you create mild social pressure. “Someone is being loud at the table next to you.” Practice the physical act of standing up, saying “I’m going to get some air,” and leaving. Most people freeze because they don’t want to be rude. Drill the exit.
### Layer 2: Don’t Be Seen / Don’t Be Noticed – Anonymity
**Goal:** If you must be there, don’t stand out as a victim or a prize.
**What to teach:** Predators do victim selection interviews. They look for distracted, overloaded, unaware, flashy people.
**Examples:**
– Head up, earbuds out, hands free when walking through a parking lot
– No $ logo bags, no phone in hand, no expensive watch flashing in a downtown core
– Being the “grey man” – not invisible, just uninteresting
**Drills:**
1. **Predator / Prey Scan:** Split class in pairs. One person is the “selector.” For 30 seconds in a public lobby, they have to pick who they’d target and why. The other person has to list 3 things they are doing that make them noticeable. Switch. Eye-opening.
2. **Baseline + Anomaly:** Take students to a window or show a video of a public place. Ask: What’s the baseline here? Then introduce an anomaly. “Guy in heavy coat in summer, pacing, not shopping.” Train them to notice when someone is paying too much attention to people, not products.
### Layer 3: Don’t Be Acquired – Deterrence & De-selection
**Goal:** You were noticed. Now make him decide you’re too much work.
**What to teach:** Acquisition is when you go from “person in the crowd” to “that one.” Deterrence is verbal and non-verbal boundary setting.
**Examples:**
– Hard eye contact + “Can I help you?” from 15 feet
– Verbal boundary: “Stop. Stay back. I don’t know you.”
– Changing direction sharply and watching if he mirrors you
**Drills:**
1. **The Interview Drill:** One student approaches: “Hey man, you got a light? What time is it? Can you help me…” The other practices the 3 steps: Create distance (step offline), hands up in a fence, verbal stop. No touching. Win = the intruder quits.
2. **Mirroring Test:** On a walk, student makes 3 consecutive unusual turns. If the person behind mirrors 2 of them, acquisition is confirmed. Time to go to Layer 1 – run.
### Layer 4: Don’t Be Hit – Counter-Mobility & Cover
**Goal:** The fight started. Don’t be where the damage is.
**What to teach:** This is not marksmanship. This is movement. A moving, obscured target is hard to hit.
**Examples:**
– Lateral movement off the line of attack, not backing straight up
– Getting to cover that stops bullets (engine block, concrete) vs concealment (drywall, car door)
– Using objects as barriers – grocery cart, chair, door
**Drills:**
1. **Get Off The X:** Partner points finger-gun. On “move,” you take one explosive lateral step and get your hands up. Measure it. Most people step 6 inches. You need 3-4 feet.
2. **Cover Hunt:** In any room, give students 3 seconds to point to true cover. Do it 5 times in different buildings. They’ll realize how little real cover exists indoors and why moving to an exit is often better.
### Layer 5: Don’t Be Damaged – Winning The Fight
**Goal:** You are being hit, minimize injury.
**What to teach:** This is your physical defense – empty hand, tool, firearm. This is where most schools START, which is backwards. By now you have failed 4 layers.
**Examples:**
– Protecting vitals, deflecting, creating space to access tools
– If you carry: drawing from concealment while moving, not standing still
– If you don’t: palm strikes, elbows, using a flashlight, bag as shield
**Drills:**
1. **Fence to Access:** From your Layer 3 fence position, partner provides pressure. Practice verbalizing “STOP!” while moving and clearing cover garment. No need to draw – just get a full firing grip while moving. 10 reps.
2. **1-Second Armor:** Partner throws a slow padded strike. Student practices covering head with forearms and tucking chin while driving forward or offline. The lesson: you WILL get hit, cover vitals.
### Layer 6: Don’t Be Killed – Medical & Will to Survive
**Goal:** You were penetrated. Don’t die from it.
**What to teach:** Most people have a plan to shoot, but no plan to plug a hole. This layer is tourniquets, pressure, breathing.
**Examples:**
– Self-aid: direct pressure on wound, applying your own TQ one-handed
– Calling 911 with effective info: location, what happened, what is needed
– Mental toughness – you are not dead until your brain tells you you are
**Drills:**
1. **The 30-Second TQ:** Every student gets a CAT or SOF-T. From concealment pocket/bag, apply to own arm high-and-tight in under 30 seconds, then leg. Do it sweaty, do it eyes-closed.
2. **Downed Drill:** After any physical drill in Layer 4 or 5, student goes to ground, simulates a leg wound, has to apply pressure with one hand and dial phone on speaker with the other. “I’m at, I need police and ambulance, adult male with bleeding…”[location]
—
**How to Close the Block:**
Go back to the onion drawing. Ask each student: “Where do you spend 90% of your training time?” They will point to Layer 5.
Then ask: “Where do 90% of real wins happen?” Point to Layers 1-3.
Give them homework: For one week, log one win per day in Layers 1-3. “I didn’t go there.” “I noticed that guy early.” “I set a boundary.”
Turn a military diagram into a life skill. Next step: Winning.