Crisis Board: Do It Yourself Readiness on a Budget
There are lots of creative ways to repurpose stuff that you have laying around. Recently I got fascinated with the concept of a bag that allowed both trauma items and spare ammo. Since then I’ve made a couple and sent them off for T&E to some people who will put them to good use. I still didn’t feel it was good enough though, so I decided to try again.
The goal was to make the “Crisis Board” at a cost of zero dollars.The only expense would be the electricity to drill some holes and cut some stuff.I managed to do just that, and the idea is here for all of you, as well. I’m not saying that there’s anything new here, just a way to repurpose stuff that you may have collected, like I have.
My board was made from a sheet of ABS I bought years ago, mistaking it for Kydex. It’s NOT Kydex. If you’re interested in getting this, $7 per sheet, Amazon, 12 inches by 12 inches.You can go larger if you want- it’s available. I’m just used to ordering in 12×12 sheets, and this was a mistake. It works great in this capacity, and if you want something similar, go for the 1/8th inch thickness.
Maybe this will be one of those epiphany moments for you, or maybe you’re already aware. MOLLE is based on a 1 inch grid, and for using paracord as your loops to mount things on, you want 1/4 inch holes. Guess what else has 1/4 inch holes, and is based on a 1 inch grid? That’s right sports fans, Peg Board. Probably didn’t see that coming, did you?
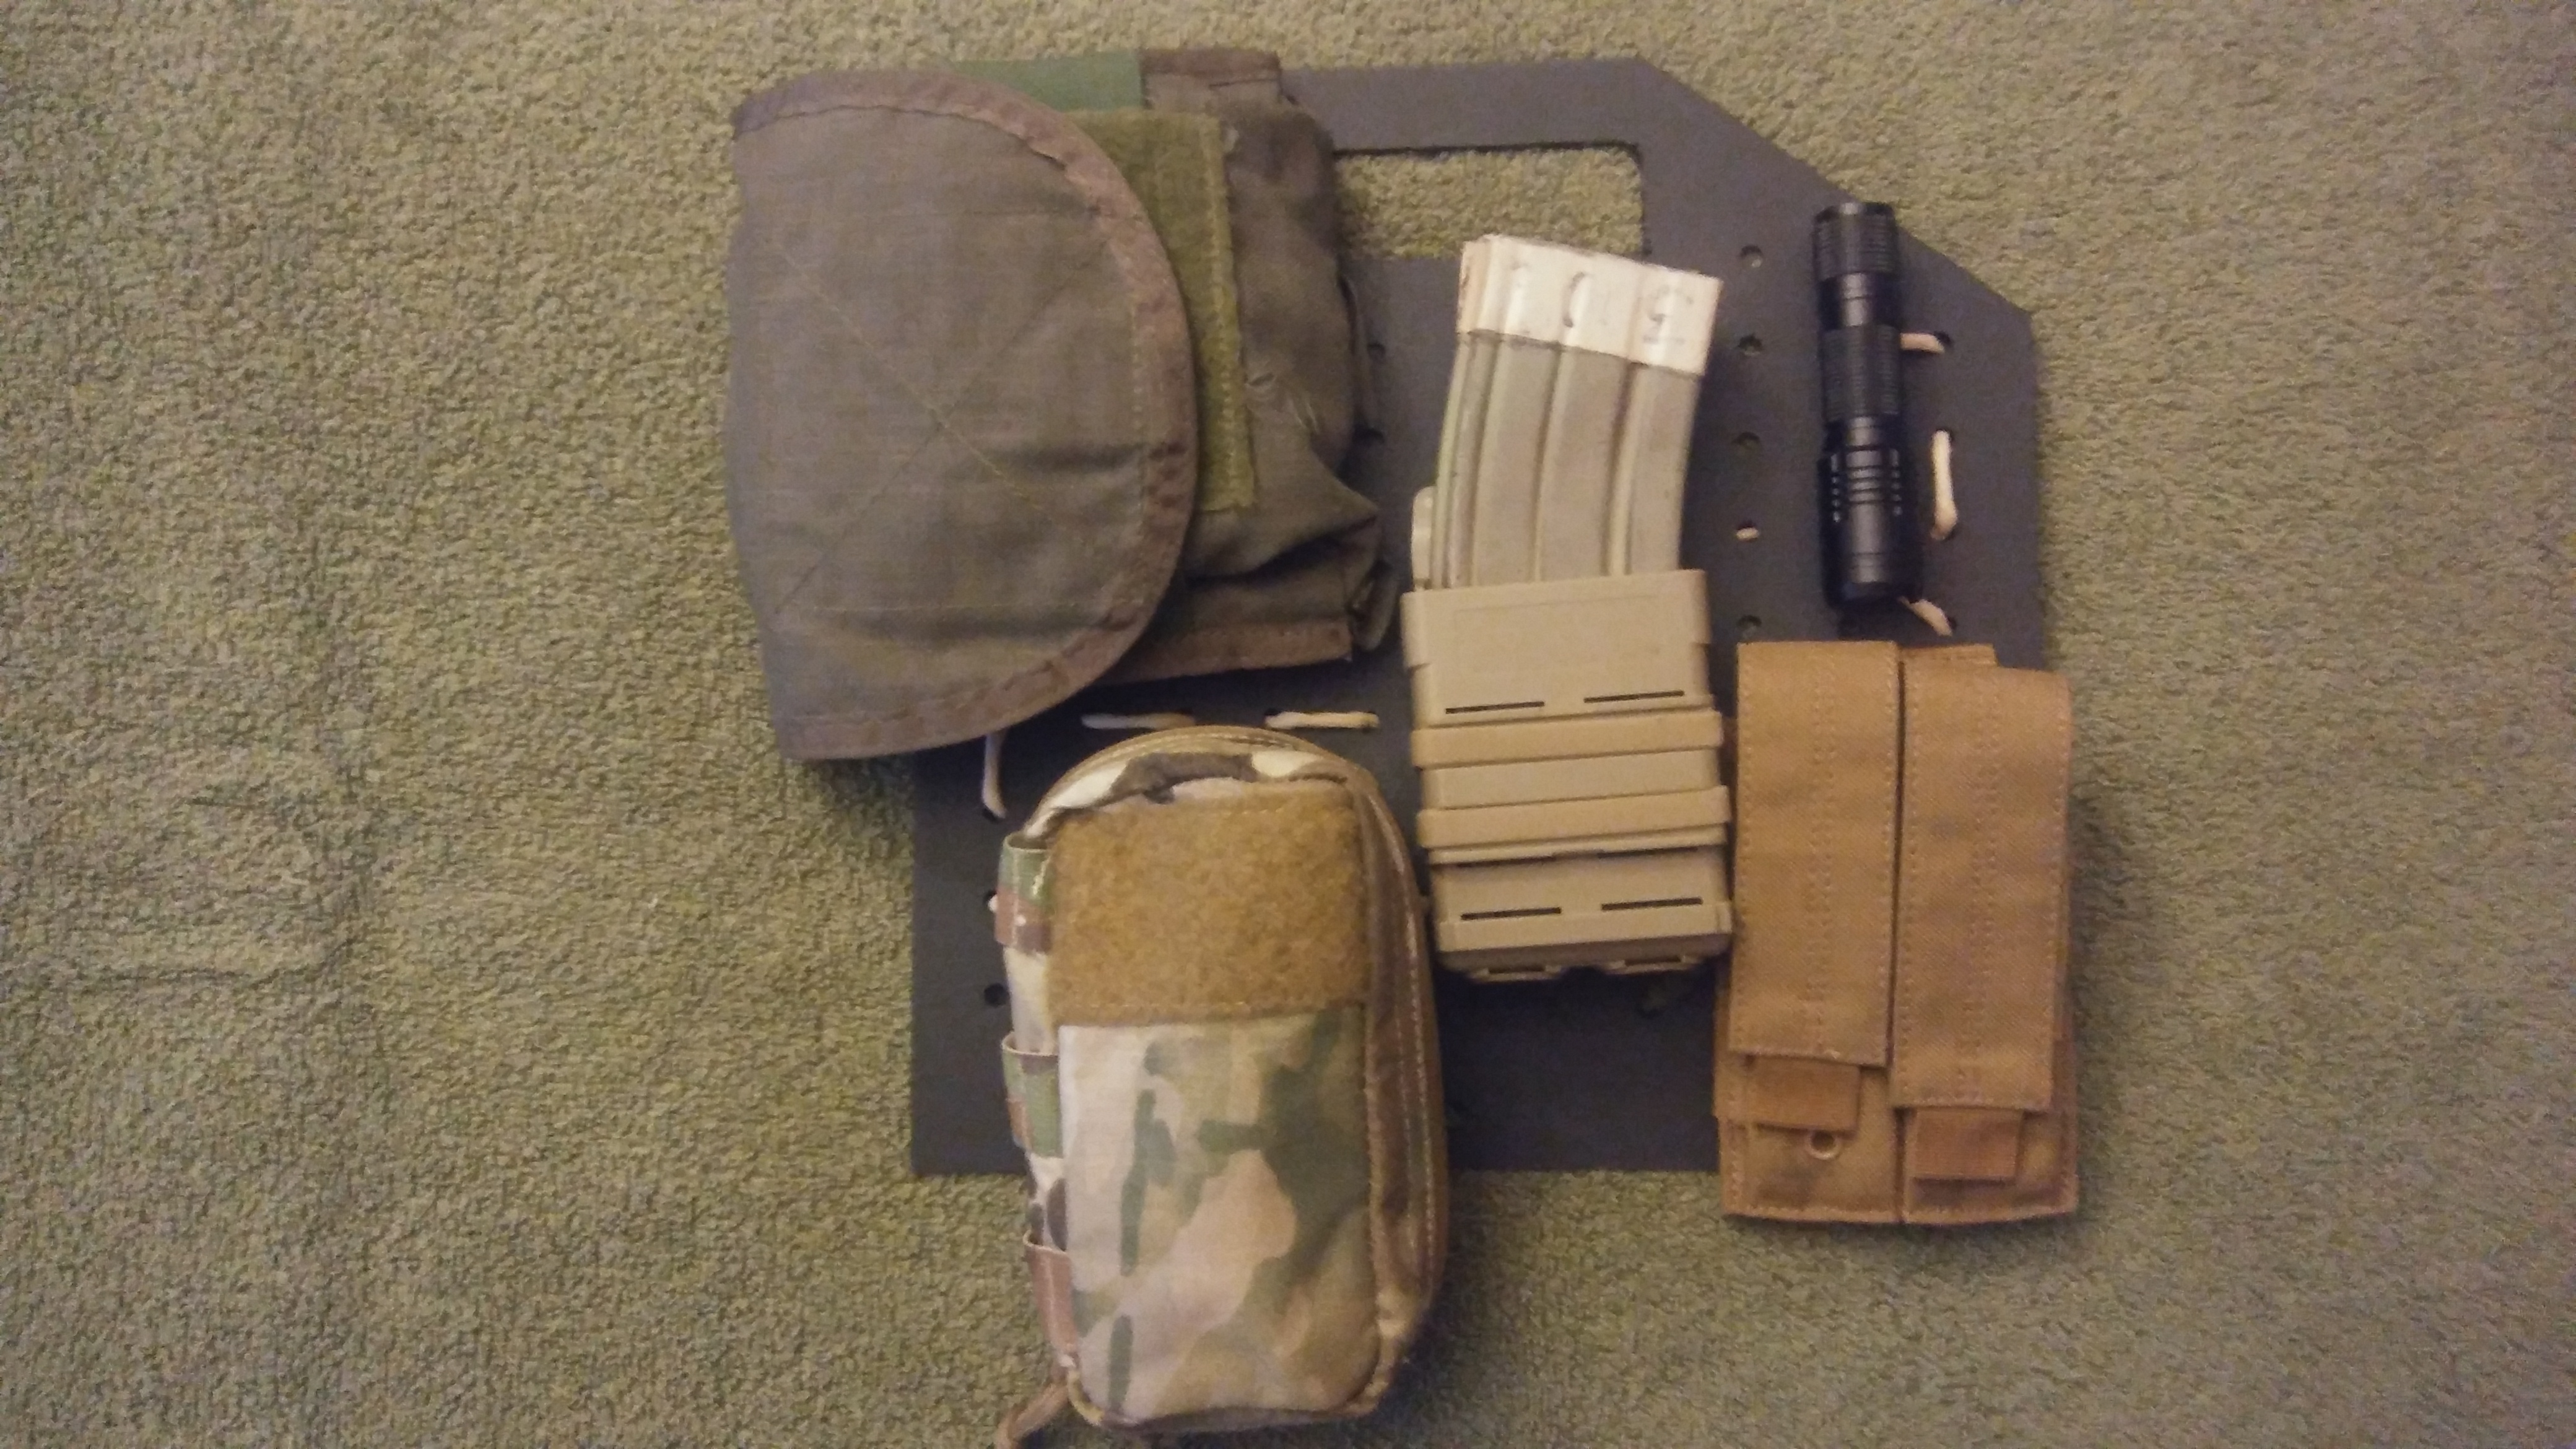
So, if you’re not the carpenter type, but own a Dremel (or know someone who does), you too can create your own “Crisis Board”, with a little help if need be. Mine is shaped like/based on an armor plate. The shape lends itself to riding on the back of my front passenger seat, with a loop riding around the headrest, attached to the carry handle at the top. With the grid drilled in the way it is, please see the picture.
As illustrated, you can put loops in vertical, horizontal, or even diagonal fashion. If you don’t have miles of paracord laying around, maybe you would prefer to use cable ties (zip ties). I cut out a carry handle, as well as slots for a shoulder sling. The sling is made from nylon webbing that I’ve scavenged off of stuff no longer servicable. If you can’t make your own sling, well, Amazon to the rescue again.
The idea was “Holy crap! there’s a car wreck. What can I do to help?” I’ve got tons of first aid gear, but it’s locked up in a box with all my tactical gear. By the time I got everything sorted out, it may be too late. All of that gear might as well be on the moon.
The board is your blank canvas to attach whatever you feel you need, on the grid. I like to use paracord for light objects, and zips on heavy stuff, like loaded magazines-sturdier. Chances are, if you follow this site you might have enough pouches right now to pull this off. You may even have the cord. The only thing missing is the peg board,or ABS sheet available via Amazon. The key part is the 1/4 inch hole. If the cord pulls through, you’ll need to make a bigger knot. You can get pretty firm loops with a long piece of cord, provided your pouches aren’t full of extremely heavy items. You could also create slots by cutting /joining holes on the grid, but I’m not really great at making slots. The other concerns with slots is that once you’ve made them there’s no going back, as well as too many slots potentially weakening the board.
As far as cutting slots in actual Peg Board, I’m clueless. This was just an alternative for those who may have that rather than random sheets of ABS. Either material could be painted to somewhat match the vehicle interior. I’d be cautious about loading it up with high speed gear and leaving it highly visible, as passersby might decide they need it more than you. You’ll want to label what’s in each pouch for instant recognition. Make sure wording is large enough to see in low light. A side benefit of this is if you have someone helping you- they can look at the pouches and read them as well.
A final alternative for those out there with metal skills and a large vehicle; there’s a “new school” type of peg board, and it’s called “wall control”. This looks like just the thing for the crafty person to fabricate all sorts of storage gear on say an off road vehicle, and hang up the stuff you might require for those types of endeavors. It basically looks like metal MOLLE, and prices are reasonable, on Amazon, yet again.
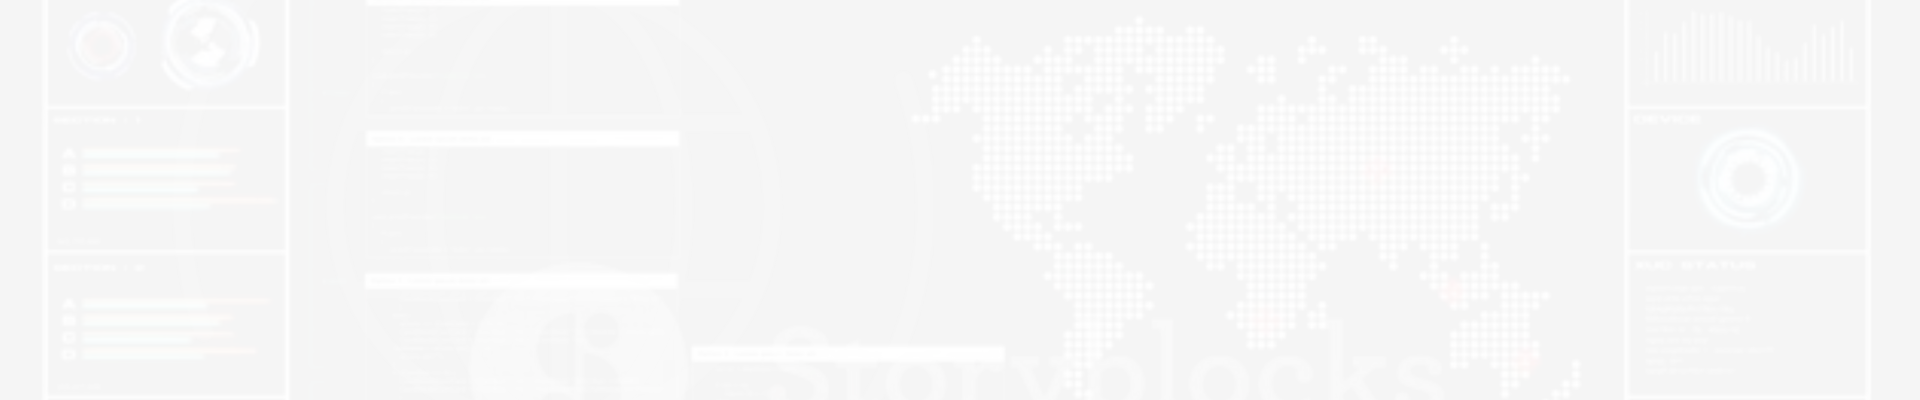
So there you have it- some options for keeping what you need close to hand without buying yet more “tactical nylon” to support all of it.If you look at the photo, you’ll see that I mounted a minimal first aid kit top left “sideways” so that the flap would open horizontally. Below that is a Multicam IFAK or GP pouch (General Purpose). Again, based on your choice it can go vertical, horizontal, or even diagonally if wanted.. The rifle magazine pouch has slots cut in the body for adding another pouch in tandem (ie-Kangaroo) and the bands allow retention for various sized magazines. The pistol mag pouch can hold mags, tools, lights, etc. The flashlight top right just clips to the paracord for retrieval if needed. This is a Lego set if you will- how you rig it is completely up to you, as a lot of this type stuff is not. Store bought stuff often equals “here it is, take it or leave it”, and choices are extremely limited.
Word to the wise- set things up on the board before lacing everything together. If you’re the type that gets frustrated easily, you’re better off using cable ties and using toenail clippers to trim them down. If you get further down the road and don’t like where something is positioned- simply change it.
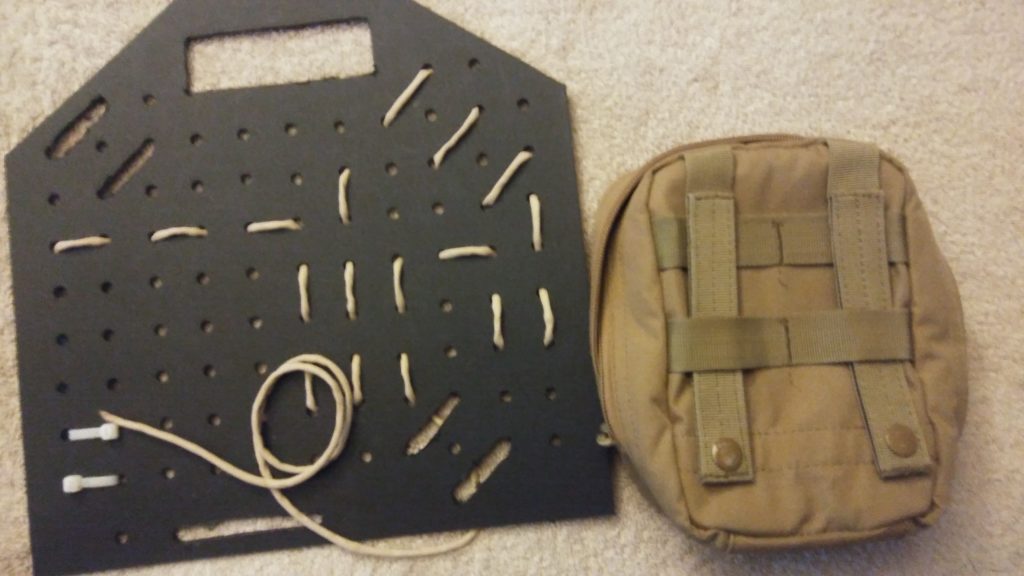
The next item I’m showing you is just a bare bones IFAK- CAT7 tq., SWAT tq., and HyFin chest seal. That’s what I carry on my person, in a cell phone case. The case was 10$ at Menards. I can waddle around with this low key, but carrying the “Crisis Board” will cause you to get side eye.
First aid kits aren’t made to be small/unobtrusive. There are 3 in the picture- The largest is what I’ve got on a battle belt, pretty fully stocked. The Multicam type is made for a regular duty belt, way smaller on goodies to not drive you nuts as you conduct your business, and the black pouch is what I carry on my person. There are absolutely no frills, but it will keep me from draining out.Remember folks, when the crap hits the fan, you have exactly what’s on you to win or die.If you believe that the single mag in the gun and no first aid gear will win the day, you really need to do some reevaluation.
Anyway, the pouch is a Nite-Ize XXL, it has elastic for stretching to hold all of this. No one looks twice at a phone pouch, and it’s concealed in the first place. Carrying stuff around in your pants pockets will wear out your first aid gear, and likely cause it to fail. The pouch has a stout polymer clip. much like what I use on my holsters.
Embrace the concept of “Defense in Depth”. Stuff goes bad in the big box store, you can get out. If you come across the big car wreck, you’ve got the “crisis board” to help. If this only gets you started, you’ve got the bag for even more assistance. If all of this still isn’t enough, dig into the lock box and produce the full sized kit to help. Maybe this seems paranoid, but until you’ve actually worked in these environments, you have no idea.I’m not saying that you’ll ever need all of this gear, and in a perfect world it wouldn’t ever be needed at all. However, we all know that things aren’t perfect.
Until next time, Stay Safe , Train Often


Antonia Scharber
This is the right blog for anyone who wants to find out about this topic.